While I believe this statement wholeheartedly, the damn things are also a lot of work.
One1 of my favorite things about the house has always been the massive, old, original2 windows all over the place.

Unfortunately, the windows have not been re-glazed3 or otherwise protected from the elements in a while. So those windows that I love (and I still do!4) changed from being quaint features on a cool house, into either a very expensive or a very time-consuming problem. As is my nature,5 I opted for the time expenditure so I could save the money for all the stuff I really can’t do. How hard could it be to restore a window (or 40), right?
Google is very helpful, but more important are all the resources I use Google to find: all of the beautiful people who not only have this particular knowledge and experience that I so completely lack, but who were willing to share said knowledge with the world. I’ve never seen the movie, but this whole ongoing house project has been completely dependent on the kindness of strangers. Thanks to these amazing folks, I figured out the order of operations:
- Remove one bit of window from frame
- Remove old glazing and metal triangles
- Remove glass (and keep safe!!!!)
- Scrape off thirty thousand layers of old paint
- Sand a lot
- Sand again when you realize all the spots you didn’t sand correctly the first time (or 3)
- Paint/Finish/Oil
- Put glass back in and glaze it
- Put window back in frame
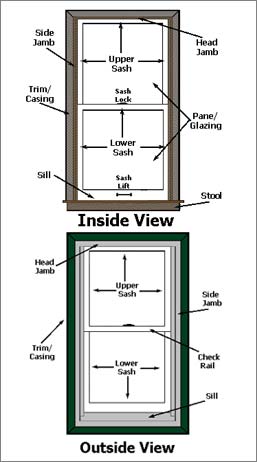
As I researched these steps over and over again I kept seeing words I didn’t understand – jamb, sash, rail, casement, stool, etc, etc. More accurately, I didn’t know what any of these words meant in this context. It was actually pretty humbling. And super annoying. And if I’m being completely honest, I still have to look most of them up to get it right (hence the borrowed diagram)
Obviously I started this project with absolutely no idea of what I was in for.
On January 18, Bridgette and I took out the lower sash of one of the narrow little windows on the sides of the south-ish-facing porch door. I figured I would start small.6 Sergiu and I put it back today (April 4). So, for those keeping track, that is an embarrassing ~2.5 month timeline for one window. I’m hoping I get a little faster with practice.
Since this left a gaping hole in my wall in the middle of a very cold and very snowy NY winter, I used foam board insulation as a placeholder.7

The twin of the lower sash I removed. I took this picture specifically to fool everyone, because I remembered too late to take a “before” picture — again! 
The frame of the window I removed, and the temporary “window” I replaced it with.
Taking the window out was easy. Super easy. Misleadingly easy – “false-sense-of-security” easy.
The next step – gouging all the old glazing and little metal triangles out of the window (while not damaging the wood or the 150 year old glass) – was a bit more time consuming.
One super awesome bonus prize of this process was that I found a beautiful red stain/color under the 4 million layers of paint on the exterior side of the sash. Since it doesn’t have any paint under the red, I am guessing that it is one of the original colors.8 So that answered the eventual question of what color to make the window sashes!

window laying flat, with some of the old glazing removed 
window laying flat, with even more of the old glazing removed 
bottom of the window sash:
See! Red! Under half an inch of old paint!
6 hours later, with kind of bloody and incredibly sore hands, I had the glass out and safely hidden away in an unused ‘bedroom’.9 With the glass safe, I felt okay handing the sash over to Sergiu for his expert scraping skills.10 <When I reminded him> He did a great job and got it all scraped off (sort of) and sanded (sort of) in a just a few days/weeks.11
I put my not-scraping/not-sanding time to good use and researched everything I could about ways to protect the windows without creating future paint-scraping woes. It was not easy research. Chipping away at that old glazing may have actually been easier. There is a lot of conflicting information out there; I don’t know if my choice will ultimately prove to be the right one. But I’m hopeful, and the decision was as evidence-based as I could manage with the ‘evidence’ available.
One of the reasons I feel pretty good about not painting it is the discovery of that red color I found under all the paint: the red was not painted on, and there was no paint under it, so I do think it was the original or early finish for the windows. I found some great not-paint options, and a pretty quickly narrowed it down to two really solid choices: linseed oil, or tung oil.12
This whole process was taking place while I was finishing up my interior firefighter training, so tung oil won.13
Pure tung oil is pretty amazing, and while I’m still unclear how well/long it will protect my windows from the elements, I do know that reapplying a coat or two of tung oil every few years will be a hell of a lot less painful than scraping the paint off (or just piling it on like every previous painter apparently did….). So, we’ll see. I have high hopes, and have about half convinced myself that the original oil/stain/finish was pure tung oil with a bit of dark red pigment.
And if nothing else, it looks amazing.

First Coat (exterior) 
First coat (inside) 
2nd coat (exterior) 
2nd coat (interior) 
4th coat, maybe? (interior) 
last coat (exterior) 
last coat (exterior)
Seven pictures showing the window sash through the over-a-month-long tung oil application process
Beautiful, eh? Sergiu applied most of the pure tung oil;14 5 or 6 coats, with 3-6 days to ‘cure’ after each. After each side.But while he did that, I started researching glazing compounds. I like the old-timey things15 so I opted for Sarco Dual Glaze instead of Sarco Type M. Because I’m a masochist who likes to make my life more difficult, and thought to myself “how can I make this process take longer?”
Actually, if I wasn’t so paranoid about everything the Dual Glaze should have saved us time, despite the weeks-longer drying process. It (so it claims) is completely capable of drying and setting properly in place – facing the elements and everything the crazy NY winter has to throw at it. But I didn’t like that idea on my first window restoration, so we glazed ‘er up and let it sit inside another month while trying desperately to keep cats and children away from it and it’s 150 year old glass.16


And by we, I actually mean we. I totally helped – and not just buying the putty and the pigments. I mixed the color in, got the putty maleable enough to use, and we rolled out long strings for the interior padding bed (for no reason whatsoever, these long strings of putty are called “putty beads”). Together, Sergiu & I set the glass in gently, placed the glazing points (the metal triangles, or the not-triangle versions I thought looked more secure), and shoved more putty onto the exterior side to keep everything safe.

Then Sergiu used his taping knife skills and smoothed it all out, though honestly I am not so impressed with this particular outcome.
Side note – I am not a good person to do these projects with. I’m constantly paranoid we are doing everything wrong, I’m super critical (I hope constructive!), and am a very, very vocal person.
So anyway, here we are in April, and I finally put the lower sash of that window back in place.
And then instantly17 took out the top sash and started the knuckle-bleeding, 2+ month process all over again.
Over/under odds on how long this one will take me?
PS: One of my original hopes for this blog was to be a resource for people who wanted to know how to do the things that we were learning to do with the house. I’ve failed at that on pretty much every post (but hopefully it is at least entertaining). There are several reasons why, but the biggest factor has probably been that I have no idea what I’m doing. The people who do know what they are doing (Sergiu and Elliot) are not writing this blog. Even when I learn how to do something, I’ve found it impossible to document the steps I’m taking while simultaneously doing said steps.
So, if nothing else, I’m going to start sharing some of the helpful resources I have found for each project.
Special thanks to the following for actually creating useful diy blog content and/or getting me through this project:
Old House Journal Online – Repair a Wood Window in 12 Steps
Old House Journal Online – How to Restore Sash Windows
The Craftsman Blog – How to Restore Old Windows
Hey Diddle Diddle – The Cat and the Fiddle
This Old House – How to Pick Tung Oil Finishes
The Craftsman Blog – DIY Window Restoration
Den of Geek – Flipper Flapper
Old Town Home – Window Sash Restoration
Do It Yourself – How to Use Glazing Putty on Wood Surfaces
Google – www.google.com
Nick Rivers – How to Straighten the Rug
Footnotes:
1 More accurately, like 50 of my favorite things. Because this house has a crazy amount of windows.
2 Unfortunately, some previous owner had cut most of the old window weight cords, but even that didn’t diminish my love. After all, it’s not the windows’ fault!
3 Glazing is apparantly not a sugar-based coating for desserts or ham that you eat as a reward for doing a good, quick job on fixin’ up your windows. The window-context glazing is significantly less good-smelling; think pungent play dough or silly puddy that leaves you looking like your hands have started petrifying.
4 Can’t guarantee I will feel the same after I’ve done more than one of these…
5 I came up with the Cheap/Lazy Scale years ago, inspired originally by Barney Stinson’s hot/crazy scale — though mine aged way better than anything on HIMYM did. On this Cheap/Lazy scale, I definitely skew cheap.
6 This was actually a real decision, not just the opportunity for an excellent – albeit mini – play on words. I was really intimidated by this project, partly because there are so many windows and partly because I really had no clue what I was doing. So I kept putting it off. I finally talked myself into forcing myself to actually start, but could only muster up the motivation/confidence to take out a small practice window.
7 I didn’t think it was going to take 2.5 months, but I knew it wouldn’t just be a few days. So I had to cover the gaping hole in my wall. I don’t love foamboard, and recognize it is very bad environmentally (I didn’t know how bad, when I bought it for a different purpose ~2 years ago) – but I’m hoping my 2 pieces of foamboard I own can be used and reused throughout my window-renovation project. Maybe I’ll store them in the basement after, so they’ll be here for the next round of window renovations (hopefully far, far into the future)
8 Or at least an early one. Or, whatever faded version of an early color exists after 100+ years.
9 I mean – can any of these rooms really be called a bedroom, if they are lacking walls and beds?
10 He’s an expert. Simple as that. Had nothing to do with the fact that I really, really, really didn’t want to scrape anything else off that window.
11 Time is relative. Lunchtime, doubly so.
12 The pure stuff, not the stuff cut with chemicals and thinners and varnishes etc.
13 Linseed oil has been known to spontaneously combust.
14 I did a couple, but it was by and far mostly Sergiu. You’re shocked, I know.
15 Like Sergiu hahahahahahahahahahahahahahahahahaha
16 Why I thought this scenario would be less stressful than just setting it back into its frame like the directions and all of Google said I could do safely, I have no idea.
17 Omg, it was not instant. It took so long to get the little pieces of wood holding it in place out – giant nails + teeny tiny strip of wood = nightmare.
